Handling your PowerShell scripts output is pretty important. The output files could be used for reporting, documentation or just general knowledge gathering purposes. Like all data outputs, garbage in does result in garbage out, but with PowerShell we can filter out the garbage and make an output file the way we want it for me. So what choices do we have for output files from PowerShell.
** Note ** For our examples, the file extension actually only matters for Excel. PowerShell will import a CSV or TXT file as a CSV file sing the Import-CSV cmdlet. However, CSV and TXT files extensions are treated differently by Excel. Something to keep in mind when working with file types for input/output.
Output Options
PowerShell provides many ways to produce our output files and we are not beholden to any one option. For example, we can dump an entire variables worth of contents to a txt file or CSV file or whatever we chose. We can also create an output file line by line or dump multiple variables into the same file. If we really wanted to we can output to a file, later read that same file in and create some sort of new output file, maybe consolidated file or maybe an HTML file for easier digesting of the results that were found.
Building your CSV line by line
When building a custom CSV with PowerShell, there are some things that need to be considered prior to putting the code into production. For the rest of the post, we will use Out-File for our CSV building process like so:
[sourcecode language=”powershell”]
$Header = 'Field1,Field2,Field3,Field3,Field4' | Out-File $Destination
$Header = 'Field1,Field2,Field3,Field3,Field4' | Out-File $Destination -Append
[/sourcecode]
(1) Decide when a file can be overwritten and when it should be appended to. This may seem like an obvious condition for building CSV files, however, a bad copy and paste can kill the use of a CSV by missing an ‘Append’ which could result in the loss of data. A good practice, if the file is storing a single or multiple data sets, then the first line that is added to the script would not have an append. This would overwrite the any existing data and allow you to add all of your data to this newly cleared file. All subsequent likes would use the ‘-Append’ switch to add new content.
One other option for the very first line, if we were worried about overwriting existing files, we can use the ‘-NoClobber’ switch to avoid destroying existing results:
[sourcecode language=”powershell”]
$Header = "Field1,Field2,Field3,Field3,Field4" | Out-File $Destination -NoClobber
[/sourcecode]
(2) Delimiter – Typically with CSV files the use of a comma would be sufficient for separating values in a CSV output file. However, imagine if you will a script that builds a line of data and one of the variables contains comma separated values (Ip Addresses, server names, etc). If this CSV file is imported into Excel and a comma is used as the delimiter for the Excel, then the columns may get skewed and not be accurate. In order to handle situations like this, its best to know what your data output might look like and apply an appropriate delimiter. In most cases, your basic comma will do and there won’t be a need to change this. However, in cases where a different character is needed, try to pick a delimiter that will be as unique as possible.
Examples
Active directory user information

Public Folder Information
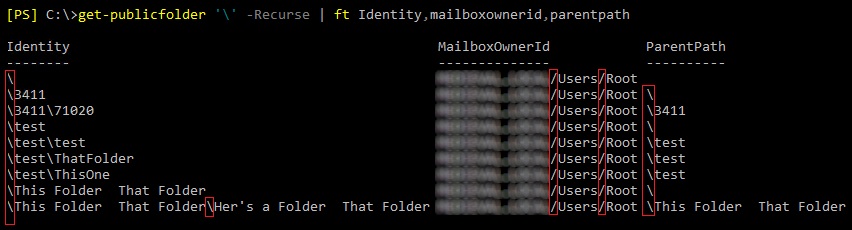
So, from the above screenshots, we can see that, if we did not chose the comma and standardized on another character we still need to be careful as we would avoid one issue and create another. Now we have no commas, no ‘/’ and not ‘\’ What else can we chose? From my experience, one character that also works is the ‘|’ character or ‘pipe’ character in PowerShell. From experience this has worked consistently for the scenarios that I’ve created scripts for. That being said, don’t take my word for it, export your data, see what potential conflicts you might have and then apply that to your scenario.
Samples of other Delimiters:
[sourcecode language=”powershell”]
$Header = 'Field1|Field2|Field3|Field3|Field4' | Out-File $Destination
$Header = 'Field1~Field2~Field3~Field3~Field4' | Out-File $Destination
[/sourcecode]
It is up to you to pick the right value so that when these values are imported into Excel the columns will be accurate. If these files are subsequently imported into PowerShell, we can specify the delimiter (otherwise it uses a comma by default).
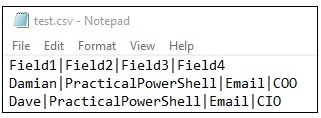
CSV File:
Importing the CSV File with the delimiter:
[sourcecode language=”powershell”]
Import-CSV Test.CSV -Delimiter '|'
[/sourcecode]

With the correct delimiter the output looks great and if we forget to specify the correct delimiter, the data does not display well:
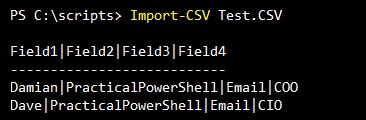
So choosing a good delimiter can be essential to good output for PowerShell results.
Building the CSV File
Now that we have a delimiter decided, we can build the file. First, we need to populate a header line which represent the columns that you would typically see in an Excel spreadsheet.
Example – Documenting DHCP Option Settings with PowerShell
Creating the header line:
[sourcecode language=”powershell”]
$Header = "DHCPServer|Name|ID|Type|VendorClass|MultiValued" | Out-file $DHCPOutputDestination -Append
[/sourcecode]
Creating each subsequent line in the CSV file:
[sourcecode language=”powershell”]
$Output = "$DHCPServer|$Name|$ID|$Type|$VendorClass|$MultiValued" | Out-file $DHCPOutputDestination -Append
[/sourcecode]
How this works: (using sample code)
[sourcecode language=”powershell”]
$Header = "DHCPServer|Name|ID|Type|VendorClass|MultiValued" | Out-file $DHCPOutputDestination -Append Foreach ($DHCPServer in $DHCPServers) { $Values = Get-DhcpServerv4OptionDefinition -ComputerName $DHCPServer Foreach ($Value in $Values) {
$ID = $Value.OptionID
If ($OptionIDs -NotContains $ID) {
$Name = $Value.Name
$OptionId = $Value.OptionId
$Type = $Value.Type
$VendorClass = $Value.VendorClass
$MultiValued = $Value.ultiValued $Output = "$DHCPServer|$Name|$ID|$Type|$VendorClass|$MultiValued" | Out-file $DHCPOutputDestination -Append } } }
[/sourcecode]
This code then provides this output:

Once these files are built you can perform post processing – create an HTML file, import into Excel or using further down in a script.