 If you manage Exchange on-premises, then knowing the size of your users mailboxes can be an important set of data to understand. The cmdlets used to get this information are pretty basic – Get-Mailbox and Get-MailboxStatistics. These can be used to provide a quick summary of data. However, they can also be used to create a richer set of data or even a set of data that can be manipulated for tasks like storage calculations, quota determinations, etc.
One challenge to gathering this data is that there are some manipulations that will only work in Exchange and not Exchange Online. Sometimes this poses a challenge if you have scripts or one-liners that you’ve used in Exchange Server and try to reuse them in Exchange Online only to find that you receive bad data in doing so. Also, if you use Windows PowerShell to connect to Exchange servers, and not the native Exchange Management Shell, there are other challenges to how the data is presented to the Shell and thus may require some additional manipulation.
Method One
The ToMB() method is a popular way to convert the data that is output by default with Exchange PowerShell. This data manipulation allows you to convert all mailbox sizes from the Get-MailboxStatistics cmdlet to MegaBytes. This makes it easier to compare data as all sizes are level set to the same measurement.
Sample #1 – Single Mailbox
In this example we are looking at a single mailbox and retrieveing statistics on its mailbox size:
[sourcecode language=”powershell”]
Get-MailboxStatistics damian@practicalpowershell.com | Select-Object DisplayName, {$_.TotalItemSize.Value.ToMB()}
[/sourcecode]
Sample #2 – Group of Mailboxes
In the below example, we are attempting to pull a list of mailbox statistics for all mailboxes that begin with the letter a. This list of mailboxes is then piped to the Get-MailboxStatistics cmdlet to pull sizes from each mailbox that meets the criteria.
[sourcecode language=”powershell”]
Get-mailbox | Where {$_.Alias -like 'a*'} | Get-MailboxStatistics | Select-Object DisplayName, {$_.TotalItemSize.Value.ToMB()}
[/sourcecode]
Sample #3 – All Mailbox
In this last example we query ALL mailboxes and the pipe their names to Get-MailboxStatistics like the above cmdlet examples:
[sourcecode language=”powershell”]
Get-mailbox | Get-MailboxStatistics | Select-Object DisplayName, {$_.TotalItemSize.Value.ToMB()}
[/sourcecode]
All of these examples are supported in Exchange Server 2010x.
** Caveat to ToMB() ** In case you migrate to Office 365, be aware that this method does not work. You read that correctly, the ToMB() method used to convert all of the TotalItemSize values to MB does not work when your mailboxes are in Exchange Online. For these cases, I have a couple of solutions listed below. Each of these does data manipulation on its own and does not rely on any other process. These samples can be used in Exchange Server as well, they are simply less elegant.
Method Two – Manual Manipulation
Now if you find yourself in a scenario where you cannot use ToMB() and you will get essentially no numbers to work with:
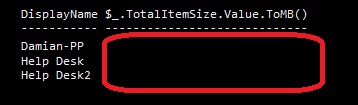
If we did not use the ToMB method, we get raw numbers like so:
DisplayName TotalItemSize
———– ————-
Damian Scoles 9.613 GB (10,322,138,748 bytes)
The work around I’ve come up with takes some doing to understand. This is because it involves manipulating the data as it is processed with PowerShell and then displaying the final view after processing is complete. The same code looks like this:
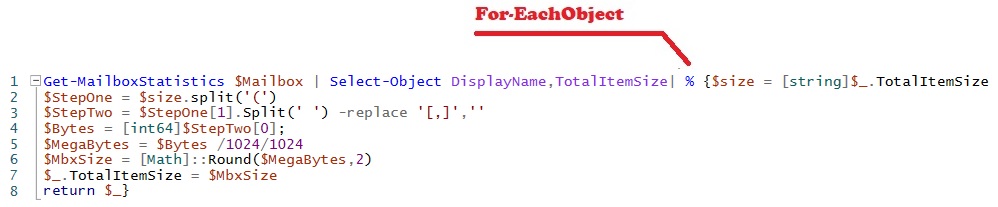
Let’s break down the above code so we understand what is going on. Line 1 has a couple of elements to it. First, we have the Get-MailboxStatistics cmdlet which will get mailbox stats for the mailbox stored in the $Mailbox variable. This information is then piped ‘|’ or fed to Select-Object which is used to choose properties that we are interested in. For this line, we’ve chosen DisplayName and TotalItemSize. TotalItemSize is the value we wish to manipulate, so we pipe ‘|’ the gathered information again. This time we use the %’ symbol in order for us to process multiple values. In the last bit of Line 1, we need to store the TotalItemSize property in a variable. This we us ‘$Size = [String]$_.TotalItemSize’. The [String] part ensures that the $size variable stored TotalItemSize as a string, which will allow for manipulation in the next few lines:
Line 2 – This line takes the $Size variable and split the string by using the left parenthesis – ‘(‘. This results in a series of stored values in the new $StepOne variable. Below are the contents of the variables:
$Size contains ‘9.613 GB (10,321,891,603 bytes)’
$StepOne Contains ‘9.613 GB’,’10,321,891,603 bytes)’
Notice that the $StepOne variable is missing the left parenthesis now contains two value. By doing this we can now manipulate the right hand values (or value 1 of an array) to allow us access to the number of bytes. So the next step will be to isolate the left hand size of the $StepOne’s value 1 of the array which is ‘10,321,891,603 bytes)’.
Line 3 will transfer the values as follows:
$StepOne[1] Contains ‘10,321,891,603 bytes)’
$StepTwo contains ‘10321891603’
After that, Line 4 converts our string back into a number. Make sure to use Int64 in case the number of bytes get too large for INT32 to handle.
In Line 5 we now can take out bytes value and divide it by 1024 twice to get MegaBytes, storing it in a $MegaBytes variable:
9843.95861434937
Line 6 rounds this using the Math function and 2 digit accuracy.
9843.96
Line 7 now transfers the rounded value store in Line 6 in the $MBXSizvariable and stores it back in the variable that we started with, $_.TotalItemSize. We use this line to replace the valure present at the begining of this process.
Line 8, we return the value back to the process so that $_.TotalItemSize is now formatted in the manner we wanted, a raw number of MegaBytes. When all is said and done, we see this now for our output:
DisplayName TotalItemSize
———– ————-
Damian Scoles 9843.96
This can now be run from Windows PowerShell, once a connection to Exchange or Exchange Online has been made, or from the Exchange Management Shell for Exchange Servers. So there you have it, a work-around for the missing ToMB function that can also be used for on-premises servers as well.
ToMB() or Not!
Categories: